

These guidelines are crafted to provide fundamental insights into the structure and construction phases of a sauna. Specifically tailored for a scenario where the sauna is integrated into a pre-existing room with concrete block walls and a tiled floor in Dubai. The ventilation system is mechanized. Throughout, paneling is utilized to moderate heater power, ensuring optimal performance. Additionally, a glass door is incorporated – when assessing the appropriate heater power level, the door’s presence must be considered, adding 1.5 m3 to the total room volume.
PLANNING STAGE
REQUIREMENTS SET BY THE HEATER Carefully review the heater installation instructions, especially regarding safety distances. No combustible materials should be within the specified safety distances to avoid fire hazards. For wood-heated stoves, protective sheathing can reduce safety distances (refer to stove installation instructions).
If the electric heater includes an external sensor, ensure it is positioned precisely as directed in the installation instructions.
For Combi heaters with steamers, a floor drain is necessary in the sauna room. If opting for a Combi model with automated water dispensing, ensure a water supply is located near the heater. Additionally, when planning electrical wiring, remember that Combi heaters require separate control panel wiring.
CABLES Familiarize yourself with the wiring requirements for lights, the heater, and the control panel/unit. Decide whether cables should be placed under or on the paneling boards.
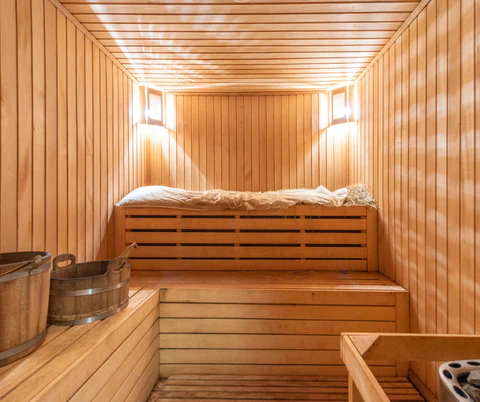
SAUNA DECORATION These instructions detail the installation of straight Formula benches. Puresteam offers a variety of bench models; explore more options.
Note that bench supports require wall reinforcements, the locations of which depend on the chosen bench model.
FLOOR AND VENTILATION
FLOOR
Ensure the floor is waterproofed in compliance with building regulations. When selecting flooring material, consider that water splashed onto the heater can erode stone, potentially staining white materials. Therefore, opt for a dark flooring. Pillar heaters should always be installed on a non-combustible floor to prevent hot stone fragments from falling through the steel frame.
The flooring material should extend 10–20 cm up the walls. Attach the material directly onto the wall or onto plywood affixed to the wall.
VENTILATION A. Supply Air Vent Placement: For mechanical exhaust ventilation, position the supply air vent above the heater. For gravity exhaust ventilation, place it below or beside the heater. The supply air pipe diameter should be 50–100 mm. Note: For heaters with separate temperature sensors, keep the supply air vent away from the sensor.
B. Exhaust Air Vent: Position the exhaust air vent near the floor, away from the heater. The exhaust air pipe diameter should be twice that of the supply air pipe. If the exhaust air vent is in the washroom, ensure a gap of at least 100 mm under the sauna door. Mechanical exhaust ventilation is recommended.
C. Optional Drying Vent: Install a vent for drying (closed during heating and bathing). Alternatively, leave the sauna door open after bathing to facilitate drying.
FRAMING
Attach Framing Studs Secure framing studs (50 x 50 mm) to the walls, spacing them at 600 mm intervals or as per the width of the insulation material.
Attach Ceiling Frames Fasten the ceiling frames to the wall frames. Sauna room heights typically range from 2,100–2,300 mm, with the minimum height determined by the heater. Ensure the distance between the upper bench and the ceiling does not exceed 1,200 mm.
HEAT INSULATION
Set the insulation materials between the framing studs. Make sure that there are no gaps in the insulation. The ceiling insulation is a particularly significant factor in energy efficiency, so install a double insulation (at least 100 mm) to the ceiling.
HUMIDITY PROOFING (ALUMINIUM FOIL)
The purpose of using aluminum foil for humidity proofing is to retain humidity within the sauna. It’s crucial to seal the foil completely to prevent humidity from permeating the structures. Aluminum foil is affixed sparingly using staples, ensuring the shiny side faces the sauna interior for optimal effectiveness.
Begin by attaching aluminum foil to the ceiling, ensuring the edges fold onto the walls for a secure overlap. Carefully tape the seams with aluminum tape to create a tight seal.
Next, install the aluminum foil onto the walls, avoiding seams in corners to simplify taping. Tape the seams securely.
Tape the lower edges of the aluminum foil onto the upper edge of the floor tiling or waterproofing to complete the enclosure.
Finally, ensure all feed-through openings are sealed with tape to prevent humidity from escaping.
NAILING BATTENS, BENCH SUPPORTS AND HEATER SUPPORT
Ceiling and Wall Preparation:
- Attach Nailing Battens:
- Secure nailing battens (e.g., 22 x 50 mm) to the ceiling, aligning them with the framing studs.
- Install Wall Battens:
- Attach battens to the walls, ensuring the upper ends are approximately 20 mm below the ceiling battens. Install them vertically to allow air circulation behind the paneling boards. If opting for vertical paneling boards, add horizontal battens onto the vertical ones.
- Reinforce Bench Support Attachments:
- Refer to your bench plan to determine bench heights. Install reinforcements at planned locations on the bench supports using wood matching the thickness of the nailing battens (e.g., 90 mm width). Attach these reinforcements to the frame.
- Support Installation for Wall-Mounted Heater:
- If using a wall-mounted heater, install a support (A) onto the wall for mounting screws. Use plywood or similar material for the support. Refer to the heater’s manual for screw locations.
- Consider Cables:
- Ensure cables are accounted for during installation, as outlined in the Planning stage (Section 1).
PANELLING BOARDS
Paneling Installation:
- Attach Paneling Boards:
- Nail the paneling boards onto the nailing battens, starting from the ceiling.
- Progressive Installation:
- Nail a few rows of paneling boards onto one wall before moving on to the next. This ensures any width differences in the boards do not impact the final result.
- Drill Holes for Electrical Wires:
- Where necessary, drill holes into the boards for electrical wires and insert the wires through these holes.
- Leave Air Gap:
- Maintain an air gap of a few millimeters between the upper edge of the paneling boards and the ceiling. This allows for proper ventilation.
BENCH SUPPORTS AND LIGHT
Bench Supports Installation:
- Follow Bench Plan:
- Install the bench supports according to the bench plan provided. Ensure alignment and stability based on the layout.
- Light Installation:
- Consider installing the light fixture at this stage, if required. For electrical work, it’s advisable to consult with a professional electrical engineer to ensure safety and compliance with regulations.
BENCHES
Lift the benches onto the bench supports. Follow the installation instructions supplied with the benches.
HEATER
Install and connect the heater in accordance with the installation instructions.
1 thought on “How do I design and build a sauna?”
Hi, this is a comment.
To get started with moderating, editing, and deleting comments, please visit the Comments screen in the dashboard.
Commenter avatars come from Gravatar.